How to Take a Screenshot on iPhone (With or Without Home Button)
Published On 23-Jul, 2025, Updated On 15-Apr, 2026
📸 How to Take a Screenshot on Your iPhone (Even If You’ve Never Tried Before)
Let’s face it—we’ve all been there. You’re scrolling on your iPhone, see something you need to save right now—maybe a hilarious meme, an OTP, a recipe, or an Instagram story—and you fumble trying to figure out how to take a screenshot.
Well, good news. Taking a screenshot on an iPhone is actually really simple, and once you get the hang of it, you’ll be using it more than you expected.
In this quick guide, we’ll walk you through all the ways to snap a screenshot on your iPhone—whether it has a Home button or not—plus a few bonus tricks you probably didn’t know existed.
Related topic: How to take screenshot on Android Phone?
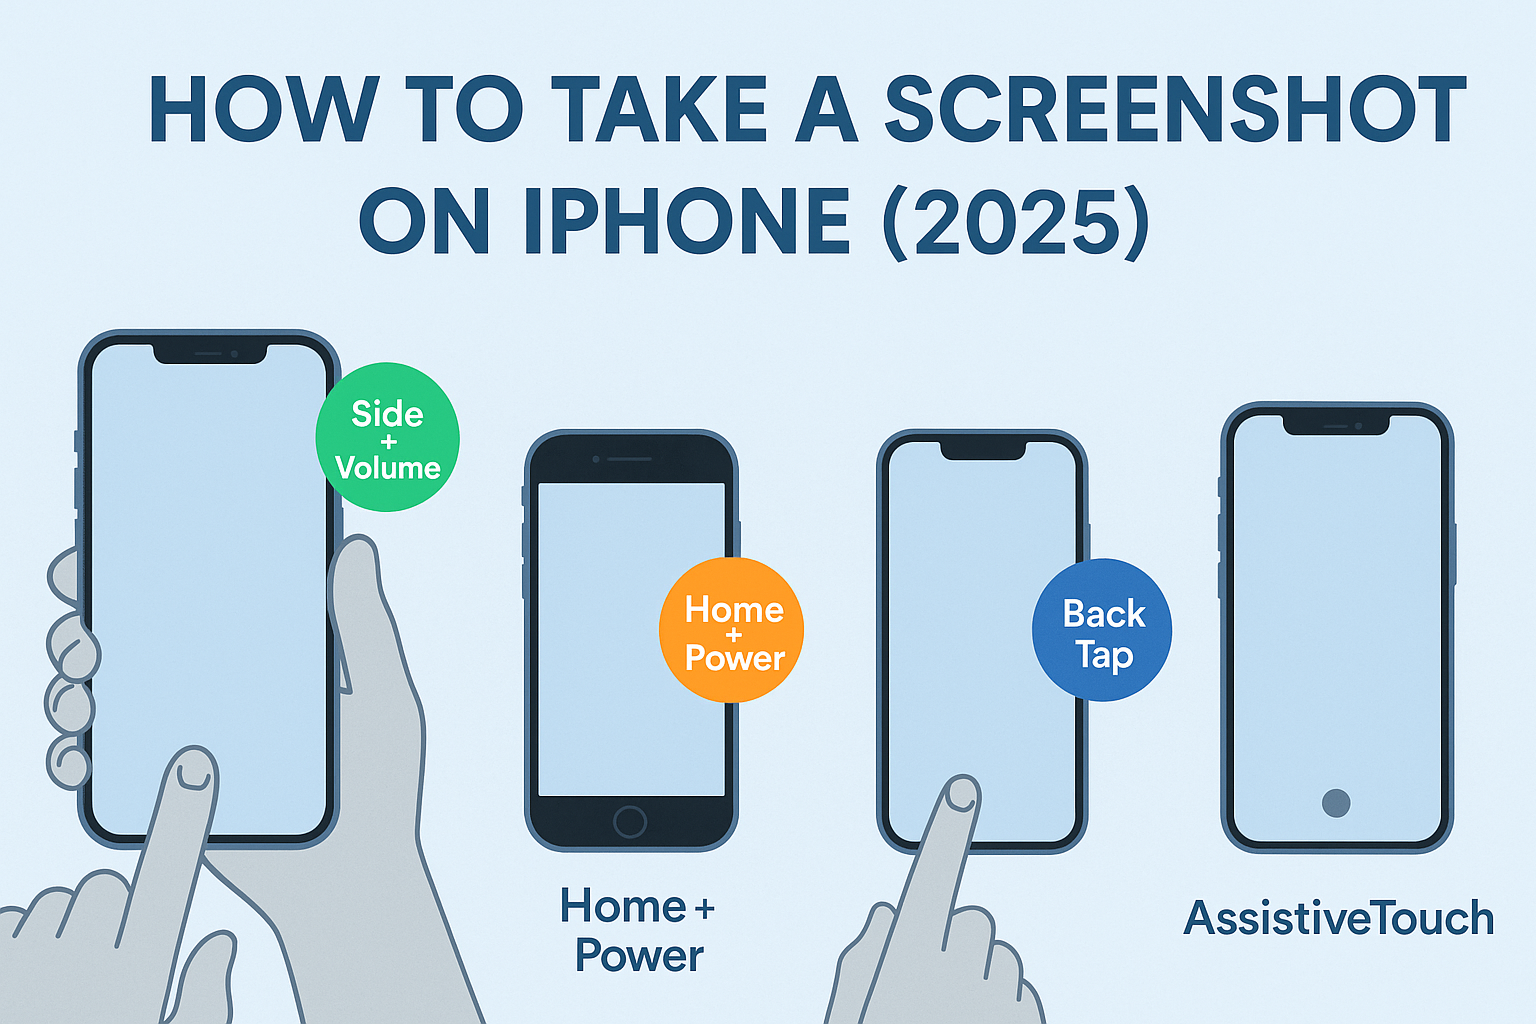
📱 For iPhones WITHOUT a Home Button (iPhone X and newer)
These are iPhones with Face ID—no round Home button.
✅ Here's how:
1. Go to the screen you want to capture.
2. Press the Side button + Volume Up at the same time.
3. Your screen will flash for a moment and you’ll hear a little camera sound.
You’ll see a thumbnail appear in the bottom-left corner. Tap it if you want to edit or share it immediately. Otherwise, it’ll automatically be saved to Photos > Screenshots.
🧷 For iPhones WITH a Home Button (like iPhone SE or older models)
If your iPhone has the classic round Home button, the process is slightly different.
✅ Try this:
1. Open the screen you want to screenshot.
2. Press the Home button + Power button (Side or Top) at the same time.
3. You’ll get the same flash + click sound, and your screenshot will be saved.
Simple as that.
✨ Bonus: Take a Screenshot Without Pressing Any Buttons
Yes, you can screenshot without touching any physical button! Here’s how.
📌 Option 1: AssistiveTouch
1. Go to Settings > Accessibility > Touch > AssistiveTouch and turn it on.
2. A floating dot will appear on your screen.
3. Tap it → Tap Device → Tap More → Tap Screenshot.
Boom—done. Great for people with hardware issues or accessibility needs.
📌 Option 2: Back Tap
1. Go to Settings > Accessibility > Touch > Back Tap.
2. Choose Double Tap or Triple Tap.
3. Set it to Screenshot.
Now, just tap the back of your iPhone and it’ll take a screenshot. (This works on iPhone 8 and newer running iOS 14 or later.)
🖼️ Where Do Screenshots Go?
You’ll find them in your Photos app, under Albums > Screenshots.
From there, you can crop, mark it up with text or doodles, or share it via WhatsApp, AirDrop, Mail—you name it.
🧠 Pro Tips
You can edit screenshots immediately after taking them by tapping the preview.
Use Mark-Up tools to highlight, write, or add shapes.
If you delete a screenshot by accident, check Recently Deleted in your Photos app.
Like to Know: Step by Step guide to screen record on Mac
🗣️ Final Thoughts
Screenshots are one of those small iPhone features that make life so much easier. Whether you’re grabbing directions, saving a booking confirmation, or just sharing something funny with a friend—now you know exactly how to do it, buttons or not.
Try each method out and see which one feels most natural. You might just find yourself using that Back Tap trick all the time. 😉